The Bike Trainer Tips 09:Bike Trainer Fixing & Adjustment: Roller & Clamp

90% of indoor trainer problems come from incorrect setup. Have you ever experienced this?
- You push hard on the pedals, the rear wheel squeaks and slips.
- Power readings jump up and down.
- After 30 minutes, you see black powder on the floor.
- Pedaling feels rough, like someone is pulling you back.
Most of the time, your trainer isn’t broken. The problem is that the contact between your rear wheel and the roller isn’t set up correctly.
In this guide, you’ll learn how to achieve the optimal contact state — not too tight, not too loose, but just right.
1. The Principle: How Should the Roller and Tire Interact?
On a wheel-on bike trainer, the working principle is simple:
The key is friction. Friction between the roller and the tire determines how effectively power is transferred.
- ❌ Too little friction → slipping → power loss
- ❌ Too much friction (excessive squeeze) → abnormal tire wear
- ✅ Just right → enough friction to transfer power without damaging the tire
We call this "Golden Contact."
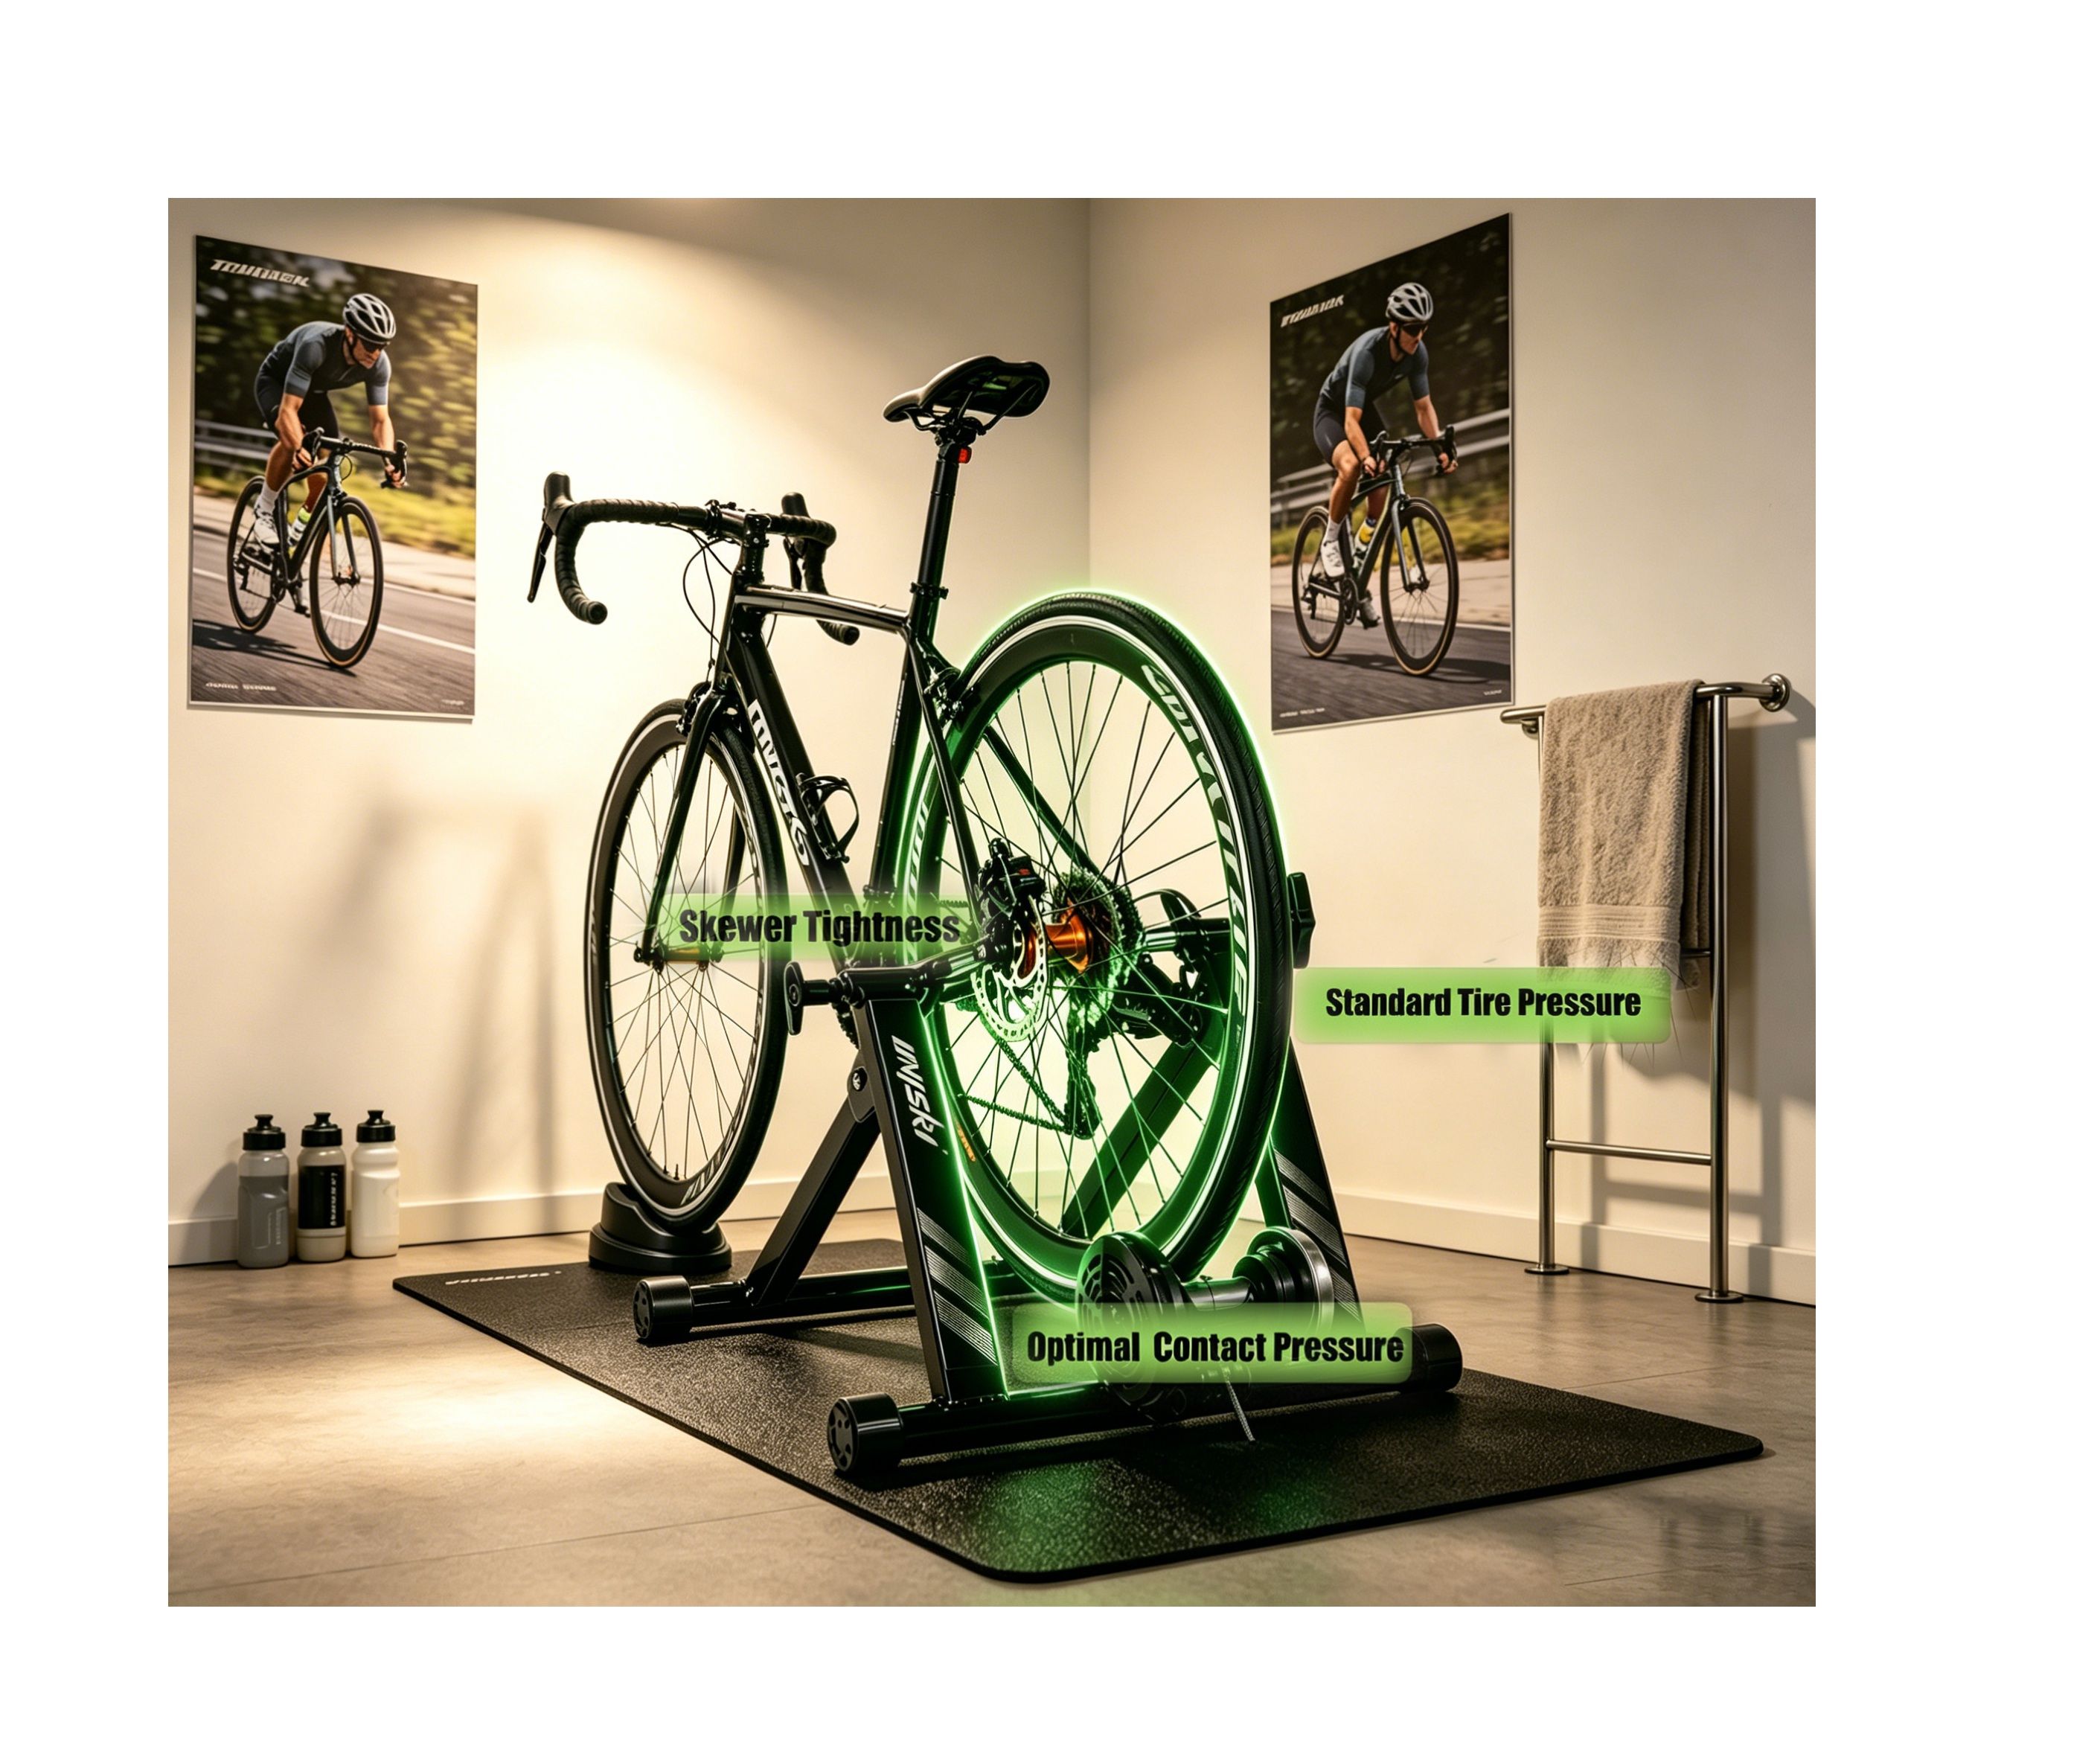
2. The Three Factors of Golden Contact
| Factor | Ideal State | Common Mistake |
|---|---|---|
| Tire Pressure | 80–100 psi (road bike) or recommended range | Over-inflated (>120 psi) or under-inflated (<60 psi) |
| Clamping Force | After contact, tighten another ½ to 1 full turn | Over-tightened or barely touching |
| Skewer Tightness | Noticeable resistance by hand, no need to force it | Too loose (wheel wobbles) or too tight (deformation) |
2.1 Tire Pressure: Higher Isn't Always Better
Many people mistakenly believe that higher tire pressure reduces rolling resistance on a trainer. That’s wrong. Trainer rollers are completely different from outdoor roads:
- 🛣️ Outdoor roads: high pressure → low rolling resistance → faster
- 🌀 Trainer roller: high pressure → tire becomes hard → smaller contact patch → prone to slipping
✅ Correct Tire Pressure
- Road bike: 80–100 psi (10–20 psi lower than outdoor)
- Mountain / Gravel bike: 40–60 psi (depending on tire width)
Important: Check tire pressure before every trainer session. Tires naturally lose 10–20 psi after just three days.
2.2 Clamping Force: The "Half-Turn Philosophy"
This is the most overlooked but most critical adjustment. Most wheel-on trainers have a knob or lever that presses the roller against the tire.
✅ Standard Procedure
- Fully loosen the knob
- Let the tire naturally contact the roller
- Slowly tighten the knob while turning the cranks by hand
- When you hear a uniform "scratching" sound, stop
- Tighten another ¼ to ½ turn
✅ The Final State Should Feel Like:
- Even resistance when turning the cranks (not jerky)
- No sharp "squeaking" slip sounds
- No visible "bulging" deformation on the tire sidewall
2.3 Skewer Tightness: Don't Forget This "Hidden Variable"
The quick-release skewer holds the rear wheel in the frame. Many think it just keeps the wheel from falling off — but it does much more.
- ❌ Too loose: The rear wheel wobbles left and right → uneven roller pressure → excessive wear on one side + slipping on the other
- ❌ Too tight: Dropouts may be squeezed and deformed (especially carbon frames) → potential frame damage
✅ Correct Tightness: When you push the skewer lever to the position parallel to the frame, you should feel noticeable resistance in your palm — but no red marks. After locking, try to shake the rear wheel. No movement at all.
✅ Test Method: Lock the skewer, grip the top of the rear wheel, and try to shake it left and right. If you see visible movement — it’s too loose.
3. Too Tight vs. Too Loose: A Comparison of Hazards
These two mistakes are the most common among beginners, and their effects are completely different.
| Aspect | Too Tight (excessive squeeze) | Too Loose (insufficient pressure) |
|---|---|---|
| Symptoms | Tire flattened, wide contact patch | Tire barely touches, visible gap |
| Sound | Dull "humming" | Sharp "squeaking" slip |
| Riding Feel | Rough, like pedaling in mud | Slips when pushing hard, power jumps |
| Tire Damage | Rapid wear, black powder on floor | No powder, but possible glazed/shiny tread |
| Roller Damage | Possible groove wear | None |
| Power Accuracy | Higher than actual (extra friction counted) | Lower than actual (power lost to slipping) |
| Long-term Consequence | Tire destroyed, roller worn | Invalid training, unreliable data, safety risk |
4. Practical Checklist: 2 Minutes Before Every Ride
Run through this checklist before each trainer session — it takes only 2 minutes.
- Step 1: Tire Pressure
✔ Is tire pressure within 80–100 psi (road bike) or recommended range?
✔ Pressing the tread — does it deform slightly? - Step 2: Clamping Force
✔ Is the knob tightened to "resistance but still turnable"?
✔ Turning the cranks — uniform "scratching" sound? No "squeaking"? - Step 3: Skewer Tightness
✔ After locking, is the rear wheel completely solid (no wobble)?
✔ Carbon frame — is the clamping force moderate (not over-tight)? - Step 4: Observe During Riding
✔ After 5 minutes, check the floor — any black powder?
✔ During hard efforts / sprints — any noticeable slipping?
⚠️ If any answer is "no" or "yes" (to a problem), stop and adjust.
5. Frequently Asked Questions (FAQ)
A: No. Direct-drive trainers are driven directly by the chain and don't involve roller-to-tire contact. This guide is for wheel-on trainers.
A: First, check tire pressure (it may be too high). If pressure is normal, check if the roller or tire is contaminated with oil or dust. Wipe both with a damp cloth, let them dry, and try again.
A: A tiny amount of powder is normal wear. But if you see a small pile after 30 minutes, it's too tight. Loosen the knob by ¼ turn and try again.
A: Possibly. Carbon frames are sensitive to localized pressure. Use a trainer-specific quick-release skewer (with markings or a limiter) or add spacers to distribute pressure. Use a slightly lighter clamping force than you would on an aluminum frame.
Final Words
An indoor trainer is a sensitive piece of equipment — but it gives you huge rewards:
- ✅ All-weather riding
- ✅ Accurate data
- ✅ Efficient training
And all of that starts with correct setup. Tire pressure, clamping force, skewer tightness — these points may seem trivial, but each one could be the reason your ride feels off.
Spend 2 minutes setting them up correctly, and enjoy an hour of smooth, effective riding.
📘 Related Resources
- How to Calibrate Your Smart Trainer
- Best Tire Pressure for Indoor Training
- Wheel-On vs Direct-Drive Trainer: Which to Choose?
Share it with a friend who struggles with trainer setup.